7 Easy Steps to Connect Arduino Uno to Android via Bluetooth

Introduction

Imagine controlling devices or logging sensor data wirelessly through your smartphone. By connecting an Arduino Uno to an Android device via Bluetooth, you can unlock exciting IoT possibilities! In this article, we’ll guide you through 7 simple steps, complete with troubleshooting tips, to make the process effortless. Let’s dive in!

Get started with building your first robot in our detailed guide on Building a Robot with Arduino.

Tools and Components Required

To start, gather the following components:

  • Arduino Uno (or similar board)
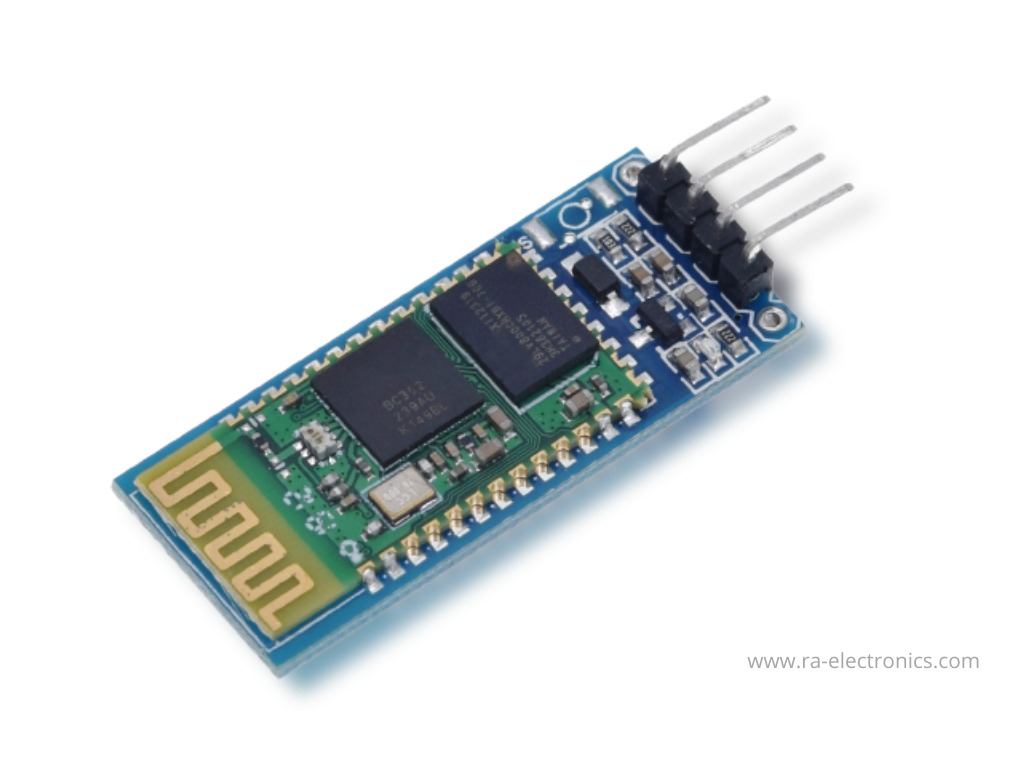
  • HC-05 Bluetooth module
  • Android smartphone
  • Jumper wires (Male-to-Male and Male-to-Female)
  • Breadboard (optional for prototyping)
  • LED
  • 1kΩ and 2kΩ resistors (for voltage divider)
Arduino Uno, HC-05 module, smartphone, jumper wires, and breadboard

Learn about different types of resistors in our article Resistor Basics: A Beginner’s Guide to Types, Functions, and Applications?

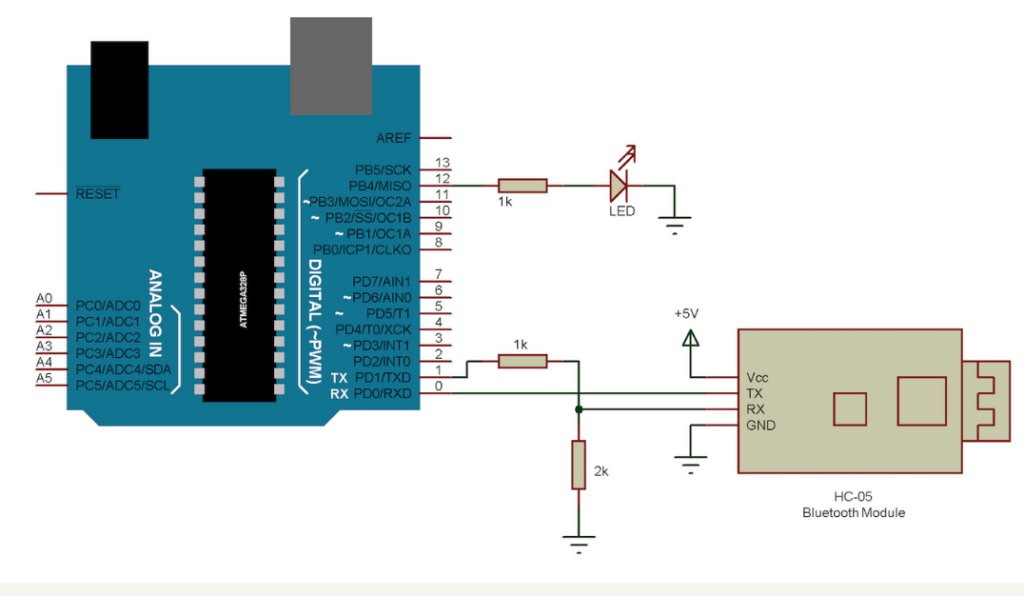
Step 1: Wiring and Setup

Follow these steps to connect the HC-05 Bluetooth module to your Arduino Uno:

  • Connect the Bluetooth Module:
    • VCC pin of HC-05 to the 5V pin of Arduino.
    • GND pin of HC-05 to the GND pin of Arduino.
    • TX pin of HC-05 to a voltage divider circuit (comprising 1kΩ and 2kΩ resistors), then to the RX pin of Arduino.
    • RX pin of HC-05 directly to the TX pin of Arduino.
  • Add an LED for Testing:
    • Connect one leg of the LED to a 1kΩ resistor, and the other leg to Arduino pin 13.
    • Connect the resistor’s free end to the GND.

Step 2: Configuring the HC-05 Module

For proper communication, configure the HC-05 module using AT commands:

  1. Upload an empty sketch to Arduino.
  2. Power the HC-05 module and enter AT mode (indicated by a slow blinking LED).
  3. Open the Serial Monitor in the Arduino IDE.
  4. Type commands like AT+NAME=MyDevice to rename the module or AT+BAUD4 to set baud rate to 9600.

Troubleshooting Tip: Ensure the module is in AT mode by pressing and holding the button on the HC-05 while powering it on.

Step 3: Writing the Arduino Code

Upload the following code to enable Bluetooth communication and LED control:

include

SoftwareSerial BTSerial(10, 11); // RX, TX

void setup() {
Serial.begin(9600);
BTSerial.begin(9600);
pinMode(13, OUTPUT);
Serial.println(“Bluetooth Ready!”);
}

void loop() {
if (BTSerial.available()) {
char data = BTSerial.read();
Serial.println(data);
if (data == ‘1’) {
digitalWrite(13, HIGH); // Turn LED ON
} else if (data == ‘0’) {
digitalWrite(13, LOW); // Turn LED OFF
}
}
}

Step 4: Pairing Android with Arduino

On your Android device:

  1. Enable Bluetooth and search for devices.
  2. Select your HC-05 module and pair it using the default PIN (1234).
  3. Use a terminal app like “Bluetooth Terminal” to test the connection by sending commands such as 1 (to turn the LED ON) or 0 (to turn it OFF).

Step 5: Sending and Receiving Data

Test the interactive example:

  1. Open the terminal app on your Android device.
  2. Send 1 to turn the LED ON or 0 to turn it OFF.
  3. Observe the LED behavior on the Arduino setup.

Step 6: Troubleshooting Common Issues

Here are solutions to frequent problems:

  • Bluetooth Module Not Detected: Check wiring and ensure the module is powered.
  • Incorrect Data Transmission: Verify baud rates match on Arduino and HC-05.
  • LED Not Responding: Double-check the wiring and ensure the LED is connected to the correct pin.

Step 7: Applications and Use Cases

Here are practical applications for Arduino and Android Bluetooth communication:

  • Home automation projects.
  • Remote-controlled robots.
  • Real-time sensor data visualization.

Table required: Comparison of popular Bluetooth modules.

ModuleVoltageRangeEase of Use
HC-053.6-6V∼10mEasy
HC-063.6-6V∼10mModerate
HM-103.3-6V∼50mAdvanced

Circuit Diagram:

circuit diagram for Connecting Arduino Uno to Android via Bluetooth

Conclusion

With these simple steps, you can effortlessly establish a Bluetooth connection between your Arduino Uno and Android device. Whether for home automation or robotics, the possibilities are endless. Get started and share your projects with us!

Looking for a suitable battery for your project? Check out our LR41 Battery Equivalent Guide.

FAQs

  1. What is the range of HC-05?

    Approximately 10 meters in an open environment.

  2. Can I use HM-10 instead of HC-05?

    Yes, but it requires different configurations.

  3. Is this method secure?

    Add custom pairing codes for enhanced security.

  4. What Android apps are recommended?

    Bluetooth Terminal and Serial Bluetooth.

  5. Can I send real-time sensor data?

    Absolutely, integrate sensors with Arduino for live data streaming.