Introduction
Ever wanted to build your own electronic circuit but felt overwhelmed by soldering irons and complicated diagrams? Good news—you don’t need any of that to get started. All you need is a breadboard.
In this complete beginner’s guide, we’ll walk you through how to use a breadboard, what it’s made of, and how you can start building real circuits in minutes—without soldering a thing.
Whether you’re a student, hobbyist, or a curious DIYer, this guide is your perfect starting point. And yes, by the end, you’ll build your first LED project. Let’s get started!
What Is a Breadboard and Why Do You Need One?
A breadboard is a simple, reusable tool used to build and test electronic circuits—without the need for soldering.
Originally, early engineers built circuits on wooden breadboards (literally the kind used to slice bread). Today’s plastic breadboards are far more advanced and user-friendly, making them perfect for prototyping electronics.

Why Breadboards Are Awesome for Beginners
- No soldering required – just plug and play!
- Reusable – move components around as you like
- Cost-effective – most starter kits come under ₹500
- Great for learning – visualize how circuits work in real-time
What’s Inside the Breadboards?
Before you start connecting wires, let’s understand how a breadboard is structured:
Key Parts:
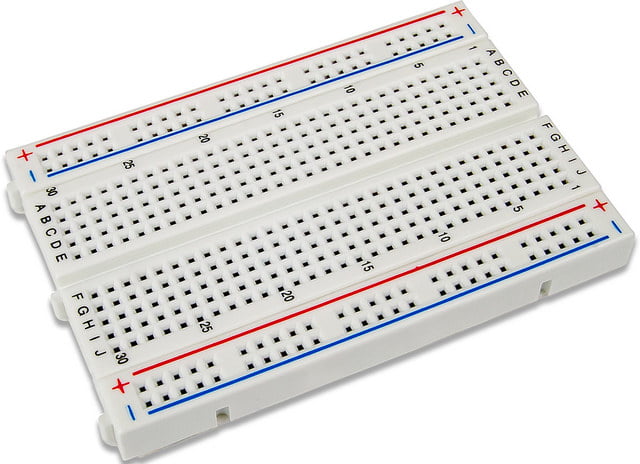
- Power Rails: Two long rows on each side—one for positive voltage (+), one for ground (–)
- Terminal Strips: The main grid where you insert components. Each row is connected horizontally.
- Center Divider/Groove: Splits the board in half—ideal for placing ICs (integrated circuits)
- Tie-points: Small metal clips hidden under the holes that make the electrical connections.
Types of Breadboards:
- Mini (170 tie points) – for very small projects
- Half-size (400 tie points) – most common for beginners
- Full-size (830 tie points) – for more advanced builds
What You Need to Get Started
Before we build, gather these beginner-friendly components:
| Component | Purpose |
|---|---|
| Breadboard | For building the circuit |
| Jumper Wires | Connect components without solder |
| LEDs | Light-emitting diodes (choose red/green) |
| Resistors | Protect components from overcurrent |
| Power Source | 9V battery or USB adapter |
| Optional: Arduino | For interactive digital circuits |
Your First Circuit: Light Up an LED in 5 Easy Steps
Let’s put theory into practice and build a simple LED circuit.
Step-by-Step:
- Insert the LED: Place the longer leg (anode) into one row, and the shorter (cathode) into another.
- Add a Resistor: Connect a 220Ω or 330Ω resistor in series with the LED’s cathode.
- Wire Power Rails: Use jumper wires to connect a 5V power source to the red rail, and GND to the blue rail.
- Complete the Circuit: Use another wire to connect the open leg of the LED to the red power rail.
- Power On!: Your LED should glow!
Understanding Breadboard Connections
The breadboard’s internal metal strips make the magic happen. Here’s how:
- Power Rails run vertically and are usually marked with red (+) and blue (–).
- Terminal Strips connect horizontally in rows of five. Insert wires/components into the same row to connect them.
- Center Groove keeps each side isolated—perfect for placing ICs.
3 Easy Breadboard Projects to Practice
Now that you’ve built your first LED, let’s level up.
1. Light-Sensitive LED
- Use a photoresistor and LED combo
- LED brightens in darkness!
2. Buzzer Alarm
- Add a piezo buzzer and push-button
- Great intro to switches and sound
3. Arduino Blink Circuit
- Connect Arduino to breadboard
- Upload code and watch the LED blink!
Conclusion
Using a breadboard is your first step into the world of electronics. It’s safe, simple, and opens up endless possibilities—from blinking LEDs to building your first smart sensor.
The best way to learn is to build. So grab your kit, try the projects above, and let your creativity lead the way.
Want more hands-on guides? Check out our tutorials on simple electronic circuits and Arduino projects.